Overview
This is the install flow I used to dual boot Arch Linux with Windows 11 on a Lenovo Legion laptop.
The goal was simple: keep Windows intact, install Arch into free space created from Windows Disk Management, and use GRUB to choose between Arch and Windows during boot.
This post covers:
- Preparing free disk space from Windows
- Booting the Arch ISO from USB
- Connecting to Wi-Fi in the live installer
- Creating EFI, root, and swap partitions
- Installing the base Arch system
- Setting up users, locale, timezone, and GRUB
- Enabling Windows detection in GRUB
- Installing KDE Plasma
- Fixing NVIDIA brightness issues on a hybrid AMD/NVIDIA laptop
Before touching partitions
A normal Windows 11 UEFI install already has a few partitions.
| Partition | What it is | Why it exists | Delete it? |
|---|---|---|---|
| EFI System Partition | Small FAT32 boot partition | Stores Windows Boot Manager and other UEFI boot files | No |
| Microsoft Reserved Partition | Small Windows internal partition | Used by Windows for partition management | No |
| Windows Recovery Partition | Recovery tools | Lets Windows repair or reset itself | Not recommended |
| Main Windows partition | The C: drive | Windows, apps, and personal files | Only if wiping Windows |
The important rule is to leave the existing Windows partitions alone. The Arch install should use only the unallocated space created for Linux.
For this setup, I used a separate EFI partition for Arch instead of reusing the Windows EFI partition. That keeps the Arch boot files separate from Windows, but you still need to confirm the partition names before formatting anything.
What Arch needs
For this install, Arch uses three new partitions:
| Partition | Example size | Filesystem/type | Purpose |
|---|---|---|---|
| EFI | 800M | FAT32 / EFI System | Stores GRUB EFI files |
| Root | 375G | ext4 / Linux filesystem | Main Arch Linux install |
| Swap | 20G | Linux swap | Overflow memory and possible hibernation support |
Swap size depends on how you use the machine. If you plan to hibernate, swap should usually be at least as large as your RAM. My laptop has 16 GB of RAM, so I used around 20 GB for swap.
Requirements
You need:
- A Windows 11 laptop or desktop
- A USB flash drive
- The Arch Linux ISO from archlinux.org/download
- Rufus or Balena Etcher
- Backups of important files
- Time to read partition names carefully
Prepare Windows
Create the free space for Arch from Windows first.
- Download the Arch ISO.
- Flash it to a USB drive using Rufus or Balena Etcher.
- Open Windows Disk Management.
- Right-click the main
C:partition. - Choose Shrink Volume.
- Enter the amount of space to give Arch.
For a basic Arch install, 40 GB is workable. I allocated around 400 GB because I planned to use it as a daily Linux environment.
Before rebooting, create a Windows restore point. It does not replace a real backup, but it gives you one more recovery option if something goes wrong.
Boot the Arch USB
Restart into BIOS/UEFI.
On my Lenovo Legion, I can enter BIOS by pressing F2 during boot.
In BIOS:
- Enable USB boot.
- Move the USB drive higher in the boot order.
- Disable Secure Boot for the basic Arch install.
- Save and reboot.
After rebooting, the machine should load into the Arch live installer as root@archiso.
Connect to Wi-Fi
Check network connectivity first:
ping google.com
ip addr show
If Wi-Fi is not connected, use iwctl:
iwctl
Inside the iwctl prompt:
device list
adapter phy0 set-property Powered on
device wlan0 set-property Powered on
station wlan0 scan
station wlan0 get-networks
station wlan0 connect <wifi-ssid>
Enter the Wi-Fi password when prompted.
Exit iwctl, then test again:
ping google.com
Optional SSH access
Typing long commands in the live installer gets old fast. If you want to SSH into the installer from another machine, start SSH and set a temporary root password:
systemctl start sshd
passwd
Then connect from another machine using the IP shown by:
ip addr show
Create the Arch partitions
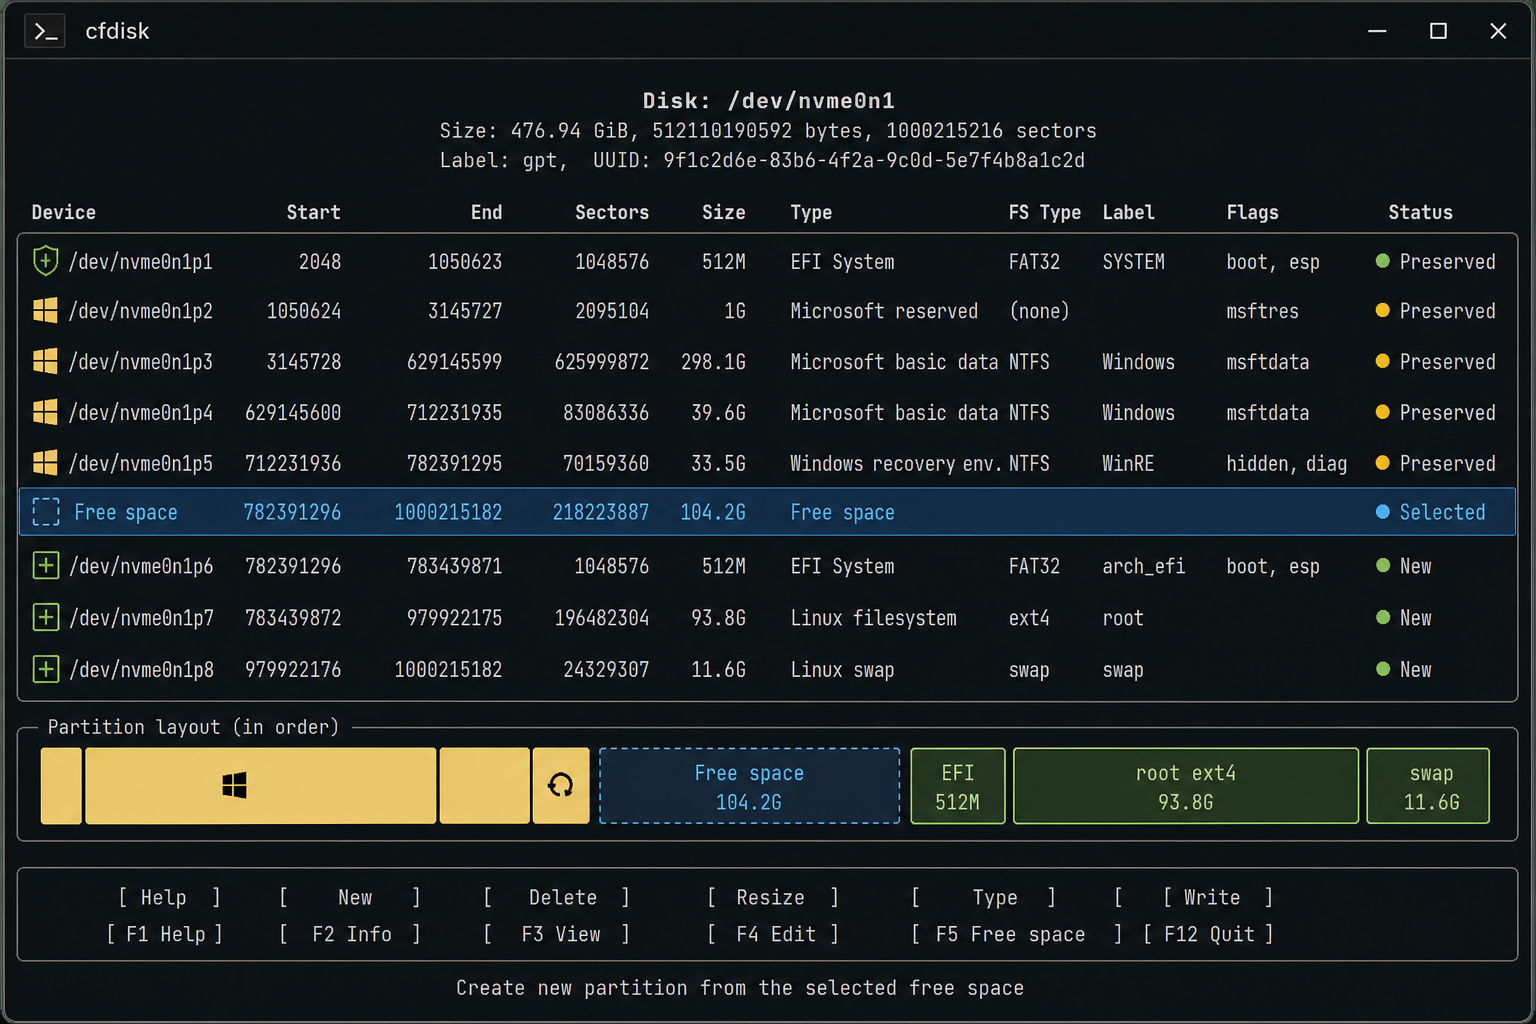
List the disks:
lsblk
In my case:
| Device | Meaning |
|---|---|
/dev/sda | USB installer |
/dev/nvme0n1 | Internal Windows/Arch drive |
Open the internal drive with cfdisk:
cfdisk /dev/nvme0n1
Use only the free space created earlier from Windows.
Create:
| Mount/use | Size | Type |
|---|---|---|
| EFI | 800M | EFI System |
| Root | 375G | Linux filesystem |
| Swap | remaining space, around 20G | Linux swap |
After creating the partitions, choose Write, confirm, then quit.
Run lsblk again and confirm the new partition names. In my case they looked like this:
| Partition | Use |
|---|---|
/dev/nvme0n1p5 | Arch EFI |
/dev/nvme0n1p6 | Arch root |
/dev/nvme0n1p7 | Arch swap |
Your numbers may be different. Replace the examples below with your actual partition names.
Format and mount
Format the new Arch partitions:
mkfs.fat -F32 /dev/nvme0n1p5
mkfs.ext4 /dev/nvme0n1p6
mkswap /dev/nvme0n1p7
Mount them:
mount /dev/nvme0n1p6 /mnt
mkdir /mnt/efi
mount /dev/nvme0n1p5 /mnt/efi
swapon /dev/nvme0n1p7
Check the layout:
lsblk
Install the base system
Sync package databases:
pacman -Sy
Install the base system and a few useful packages:
pacstrap -i /mnt \
  base \
  base-devel \
  linux \
  linux-firmware \
  linux-headers \
  networkmanager \
  bluez \
  bluez-utils \
  vim \
  fastfetch \
  amd-ucode \
  openssh \
  htop \
  git
If you use an Intel CPU, replace amd-ucode with:
intel-ucode
Generate fstab:
genfstab -U /mnt >> /mnt/etc/fstab
Enter the installed system:
arch-chroot /mnt
Configure users and sudo
Set the root password:
passwd
Create a normal user:
useradd -m -g users -G wheel <user-name>
passwd <user-name>
Enable sudo for the wheel group:
EDITOR=vim visudo
Uncomment this line if you want passwordless sudo:
%wheel ALL=(ALL:ALL) NOPASSWD: ALL
For a stricter setup, use the normal password-based sudo line instead:
%wheel ALL=(ALL:ALL) ALL
Configure time, locale, and hostname
Enable network time:
timedatectl set-ntp true
Set the timezone:
ln -sf /usr/share/zoneinfo/Asia/Manila /etc/localtime
hwclock --systohc
Edit locale settings:
vim /etc/locale.gen
Uncomment:
en_US.UTF-8 UTF-8
Generate the locale and write the locale config:
locale-gen
echo LANG=en_US.UTF-8 > /etc/locale.conf
Set the hostname:
HOSTNAME=arch
echo "$HOSTNAME" > /etc/hostname
Create /etc/hosts:
cat <<EOF > /etc/hosts
127.0.0.1   localhost
::1         localhost
127.0.1.1   ${HOSTNAME}.localdomain ${HOSTNAME}
EOF
Install GRUB
Install GRUB and EFI tools:
pacman -S grub efibootmgr
Install GRUB to the Arch EFI partition:
grub-install --target=x86_64-efi --efi-directory=/efi --bootloader-id=GRUB
Generate the GRUB config:
grub-mkconfig -o /boot/grub/grub.cfg
Enable networking and Bluetooth for the installed system:
systemctl enable bluetooth NetworkManager
Exit, unmount, and shut down:
exit
umount -R /mnt
shutdown now
Remove the USB drive, then boot the machine again.
First boot into Arch
After rebooting, GRUB should appear and let you boot into Arch.
Connect to Wi-Fi using NetworkManager:
nmcli dev status
nmcli radio wifi on
nmcli dev wifi list
sudo nmcli dev wifi connect <wifi-name> password "<password>"
Update package databases:
sudo pacman -Sy
Install yay for AUR packages:
sudo pacman -S --needed git base-devel
git clone https://aur.archlinux.org/yay.git
cd yay
makepkg -si
Add Windows to GRUB
At this point, Arch boots, but Windows may not appear in the GRUB menu yet.
Install os-prober:
sudo pacman -S os-prober
Open the GRUB defaults file:
sudo vim /etc/default/grub
Add or uncomment:
GRUB_DISABLE_OS_PROBER=false
Regenerate GRUB:
sudo grub-mkconfig -o /boot/grub/grub.cfg
The output should mention Windows Boot Manager. After rebooting, GRUB should include both Arch Linux and Windows.
Install KDE Plasma
Install Xorg:
sudo pacman -S xorg-server xorg-apps
Install KDE Plasma and common fonts:
sudo pacman -S \
  plasma-meta \
  plasma-workspace \
  kde-applications \
  noto-fonts \
  ttf-dejavu \
  ttf-font-awesome
Install and enable SDDM:
sudo pacman -S sddm
sudo systemctl enable sddm
Reboot:
reboot
Install NVIDIA drivers
On my Lenovo Legion 5, the laptop screen brightness was extremely low after booting into the desktop. Installing the NVIDIA driver fixed it.
For the current Arch driver:
sudo pacman -S nvidia-dkms nvidia-utils nvidia-settings
If you need a specific NVIDIA version, search the available AUR packages and install the matching driver:
yay -Ss nvidia
yay -S nvidia-<driver-version>-dkms nvidia-<driver-version>-utils
Reboot and test:
nvidia-smi
Enable multilib
Steam and some desktop apps need 32-bit libraries. Enable the Arch multilib repository:
sudo vim /etc/pacman.conf
Uncomment:
[multilib]
Include = /etc/pacman.d/mirrorlist
Then update:
sudo pacman -Syu
Install a few extra packages:
sudo pacman -S flatpak steam
yay -S kdotool
flatpak install app.zen_browser.zen
Fix low brightness or black screen on NVIDIA
If the desktop boots to a black screen, or the laptop display is visible but extremely dim, edit GRUB:
sudo vim /etc/default/grub
Set the kernel command line:
GRUB_CMDLINE_LINUX_DEFAULT="quiet splash nvidia-drm.modeset=1 nvidia_drm.fbdev=1 acpi_backlight=native nvidia.NVreg_RegistryDwords=EnableBrightnessControl=1"
Apply the changes:
sudo grub-mkconfig -o /boot/grub/grub.cfg
sudo mkinitcpio -P
For KDE Plasma on Wayland with NVIDIA, add these environment values:
sudo vim /etc/environment
GBM_BACKEND=nvidia-drm
__GLX_VENDOR_LIBRARY_NAME=nvidia
Reboot after changing these files:
reboot
Add a KDE terminal toggle shortcut
I also added a custom KDE shortcut for toggling a terminal with Ctrl + |.
Download the script:
wget -nc https://raw.githubusercontent.com/alphiree/dotfiles/main/toggle-terminal.sh -P ~/.local/share/applications
chmod +x ~/.local/share/applications/toggle-terminal.sh
Create a desktop entry:
cat <<EOF > ~/.local/share/applications/toggle-terminal.desktop
[Desktop Entry]
Exec=/home/alphire/.local/share/applications/toggle-terminal.sh
Name=toggle-terminal
NoDisplay=true
StartupNotify=false
Type=Application
X-KDE-GlobalAccel-CommandShortcut=true
EOF
Add the shortcut:
echo "[services][toggle-terminal.desktop]\n_launch=Ctrl+|" >> ~/.config/kglobalshortcutsrc
Reboot or restart the KDE session after updating shortcuts.
Troubleshooting notes
| Problem | Check |
|---|---|
| No Wi-Fi in live installer | Use iwctl, confirm the device name with device list |
| Wrong partition names | Run lsblk before every format or mount command |
| Windows missing from GRUB | Install os-prober, enable GRUB_DISABLE_OS_PROBER=false, regenerate GRUB |
| Black screen after Plasma install | Try NVIDIA DRM kernel flags and rebuild initramfs |
| Brightness stuck very low | Install NVIDIA drivers and add the brightness kernel parameter |
| Steam missing libraries | Enable [multilib], then run sudo pacman -Syu |
Final setup state
After this setup, the machine boots into GRUB with both Arch Linux and Windows available.
The Arch side has:
- Base Arch system
- NetworkManager Wi-Fi
- Bluetooth
- GRUB UEFI boot
- Windows Boot Manager detection
- KDE Plasma with SDDM
- NVIDIA driver support
yayfor AUR packages- Flatpak and Steam support
The next thing I would clean up is Secure Boot. For this install, I disabled it to keep the first Arch setup simple. Re-enabling Secure Boot properly means signing the bootloader and kernel pieces instead of just toggling it back on in BIOS.